Saturday, September 4, 2010
Wednesday, September 1, 2010
Refinishing A Chair
Today, I refinished a dining room chair. I have done many pieces of furniture. Some worked out well and others were complete flops so, I will share my favorite products and the steps that have worked for me. First of all, find an ugly chair that has a pretty skeleton (decorative work or just strait if that's what you like.)
 I love the woodwork on this chair but, hate the colors and fabric. No problem, I'll just change it.
First, I remove the cushion and clean the chair.
 Then, I spray paint it a MATTE BLACK. I prefer the .98 cent spray paint at Wal-mart Matte adheres to the slick coat on the chair without having to sand it first. After the spray paint is completely dry, I coat it with a brush on Krylon Paint.(Sold right next to the spray paint)
 After completely dry, I like to sand the edges to give the chair a shabby-chic look
 to be cont......

First, I remove the cushion and clean the chair.


Thursday, August 26, 2010
Red Velvet Cupcakes

In a saucepan, I mixed 1/2 cup heavy cream with 1 cup of milk and a tsp. of vanilla. I put 2/3 cup of flour to the side. Then waited for the milk to come to a simmer while stirring. Then, slowly added the flour while whisking it in so there wasn't any lumps in my frosting. As soon as it turned thick, I put it in a bowl, covered it and popped it in the fridge.
In my mixer, I put 3 sticks of unsalted butter and added 3 cups of powdered sugar. I mixed it real well and then slowly added the cold paste a little at a time until all mixed.
PIPING TRICK: Plop a big heap of frosting on a rectangle of saran wrap. fold the wrap over the frosting both sides and then wind the ends. It should look like old fashioned hard candy wrapper. When ready to pipe, cut one end of the saran wrap and put it down into the piping bag. It makes it easy to use the piping bag multiple times while keeping the bag nearly clean.
I used a large round tip and sprinkled them with sugar sprinkles. **The frosting is best after setting up in the fridge for a bit...or as long as you can resist.
Beaded Watch

Materials:
All of the materials I used today were purchased at Michaels using the 40% off coupons from the Sunday paper. (If you are into coupons...purchase more than 1 Sunday paper and you'll get multiple coupons.)

- .5mm elastic for jewelry making
- Watch face
- Decorative Beads of your choice and Spacer beads
- Crimp beads
- Crimp tool
- Scissors

- I cut 2 long strips of elastic *double the wrist plus some extra* and threaded them onto the watch face
- Thread the beads as desired
- Put a long spacer bead on all the threads to keep it together. I only put one on this watch since it's for a tiny wrist.
- Tape off one end or you'll lose your beading
- Make sure to pull the elastic a few times to pre-stretch it a bit or it'll stretch later.
- Thread the elastic through the other side of the face and "Crimp" it as oulined in the document attached below in Jewelry 101.
- Trim the extra elastic leaving enough to thread through the first few beads to hide it.
- You have a beautiful watch!!!
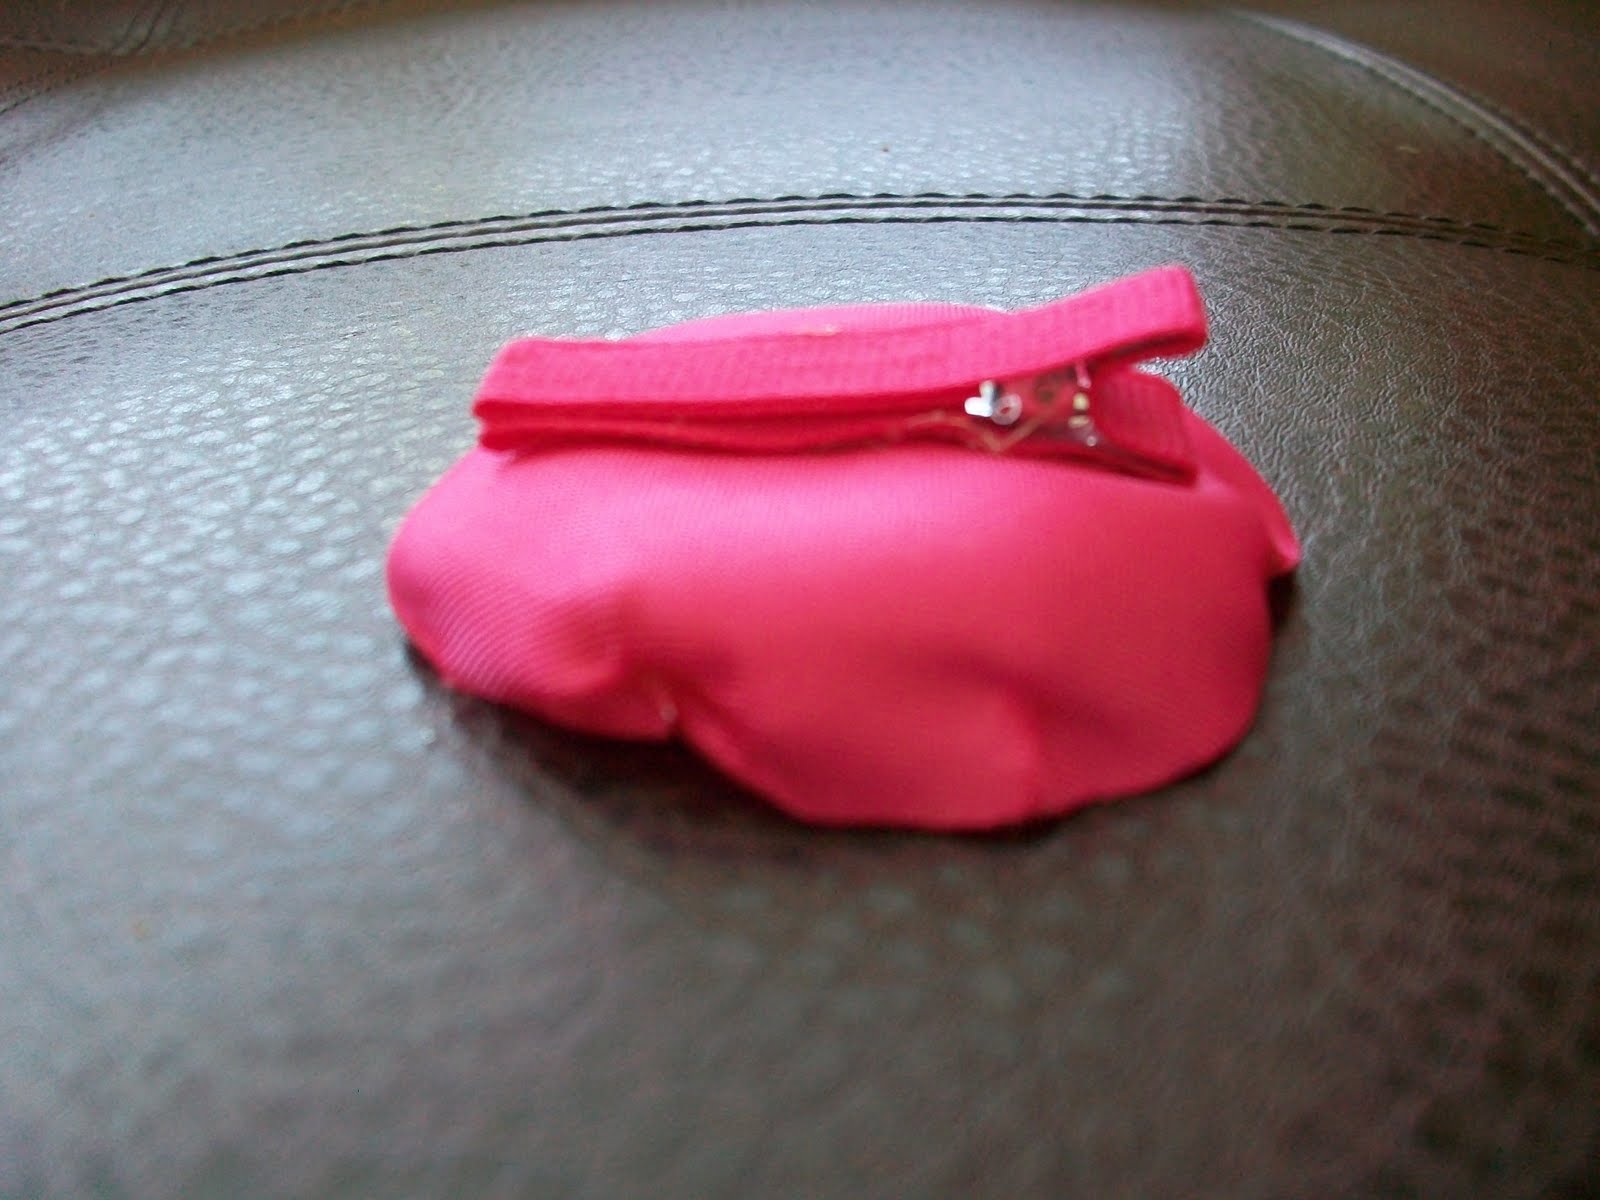
 |
| Thread all the elastic through the spacer bead |
 | ||
| Crimp Beads added on the left. Tape on the right. |
 | ||
| Threading through the watch and then the crimp bead. |

Tuesday, August 24, 2010
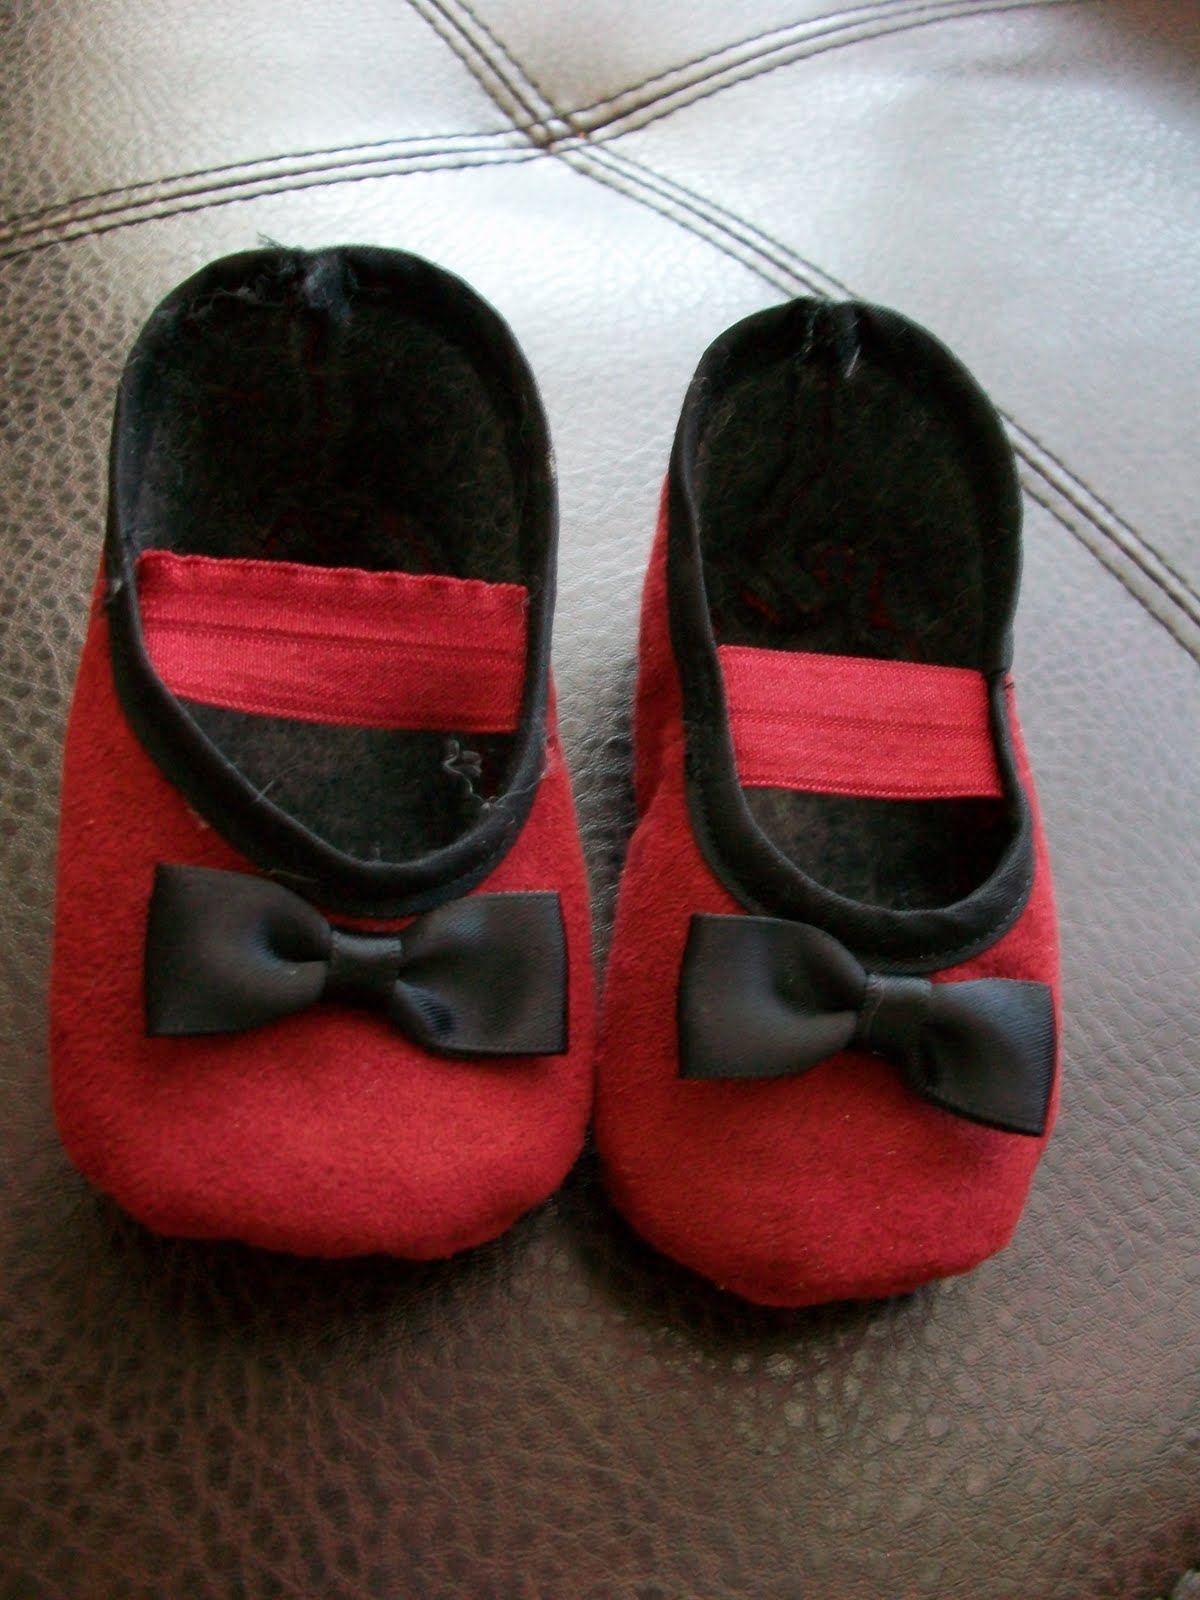
Baby Booties

This is my most recent project. I love it because you can be so creative and use fun fabrics and contrasting colors. I will be making green shoes with pink piping next with a flower accent on top.
Materials for 9-12 month size:
- Save pattern image to your computer and print full page size
- 10"x10" square of fabric, wool felt and fusible web
- 5/8 in wide ribbon 2x9in strips or decorative elastic 2x4 in pieces
- 1/4 in wide binding to match or contrast fabric 2x9in pieces
- Velcro for the straps
- sewing thread


- Print 2 patterns. Flip one over and mark so you have a left and right foot.
- Cut out the fabric, wool felt and fusing squares. Using a press cloth, fuse the fabric and felt together using the manufacturers instructions.
- Place the pattern pieces on the square, pin and cut out.
- mark the lines on the wrong side with a pencil or chalk pencil
- Carefully stitch binding pieces to the inside edge (top) of the shoe (pictured above)
- Fold your ribbon pieces in half and stitch all around the edges (If using decorative elastic, skip this step)
- Sew a piece of velcro to the clean end of the ribbon
- Sew the other piece of velcro to the opposite side of shoe on the fabric side
- For decorative elastic, sew to the inside edge of the shoe and secure by sewing a square. Make sure to sew close to the binding edge.
- Back to the shoe: Place the back edges together with the right sides of fabric facing in. Stitch 1/8in from the edge. Now it's ready to attach the sole.
- Leaving the shoe inside out, pin the sole to the shoe, making sure to line up the lines you marked earlier. Pin so you can sew with the pins in as long as possible. It is hard to keep together otherwise.
- Sew along the edge 1/8in from the edge. Be careful not to catch the strap!!
- Turn inside out and reshape.
- Add any embellishments you desire. Be creative!

Ribbons and Lace
Ribbons and Lace is Coming Soon Online: Ribbons and Lace is my favorite store in the whole world and it is going online. I usually have to make a special trip when I go to AZ but, finally they'll be online for everyone!!!!
They will sell kits for couture wipes cases, kits for tulle tutus (the kits will be your best and easiest option), fabric and silk flowers for sandals, hair clips, hats etc.The site will have instruction videos which is AWESOME!! I will update you when it's ready to go!
They will sell kits for couture wipes cases, kits for tulle tutus (the kits will be your best and easiest option), fabric and silk flowers for sandals, hair clips, hats etc.The site will have instruction videos which is AWESOME!! I will update you when it's ready to go!
Monday, August 23, 2010
Flower Clip

Materials:
silk flower
alligator clip
ribbon to cover clip
hot glue gun
jewel
All you do is remove the middle stem section of the flower, glue the petals together near the center and then glue a jewel on. I prefer to use buttons as they look nicer than the cheap "flat bottom" jewels. I use pliers to remove the button loop hole and then glue it right in the center. Then attach to a covered alligator clip using the trusty glue gun. Wala! A beautiful flower clip.
Hair Flowers

To begin this project, you need the following materials:
- Satiny Fabric (very little) I purchased 1/8 yd and it cost me 25cents. Made with polyester
- lace approx. 6 inches
- pearls or jewel for the center
- hot glue gun
- alligator clip (see photo below)
- 1/4 inch grosgrain or satin ribbon

Next is the clip. carefully hot glue a small piece of the 1/4 inch ribbon around the clip. Then, glue the flower on top.


You are now finished and can create as many colors as you wish!!! Just interchange the various flower clips to the one headband! Isn't that great?!

Red Velvet Cake

I just made the tastiest 3 layer red velvet cake with creme' filling and marshmallow fondant. It was my first attempt at making a cake from scratch and it was so easy. I learned a few tips along the way looking at various recipes. First of all I used a generic red velvet cake recipe and put it in 3 9-inch pans that were greased, floured and lined with parchment paper rounds. That was key to my new found success. Parchment paper ensured no sticking! Let the cakes cool completely and flip out onto saran wrap. Cover in Saran wrap and freeze.
Marshmallow fondant: http://allrecipes.com/Recipe/Marshmallow-Fondant/Detail.aspx Note: I refrigerated it and it was too stiff to roll out. Might work better to use immediately. If you want to avoid making fondant or decorator frosting, Duff Goldman (Ace of Cakes) has a line at Michael's you can buy already made.
For the cream filling, I used this frosting recipe http://www.foodnetwork.com/recipes/bobby-flay/red-velvet-cake-recipe/index.html.
You will need to make decorator icing after the creme' frosting to dirty ice the cake later.
Here is the recipe:
Ingredients:
3/4 cup shortening
1/2 cup water
1 egg white
1 tsp vanilla
2lbs powder sugar
mix until light and fluffy.
All the Ingredients are ready to stack and decorate. Place a layer of cake on a cake round. Pipe creme' filling from a decorator bag without a tip on. Smooth layer and add more cake. Repeat a creme layer and top with the 3rd layer of cake. Then dirty ice the cake with the decorator frosting. After the cake is covered with frosting, roll out your fondant and place on cake. Smooth fondant and trim. Then decorate as desired.
Terese Plumridge
Saturday, August 21, 2010
Tulle Tutus

Skill Level: Beginner
Tools: 6inch wide Tulle Ribbon (found in the wedding section at wal-mart as 60yd bolt)
you need 40-60 yards depending on skirt length.
ARIZONA: Ribbons and Lace has all the materials and can instruct you further
elastic to fit around child's waist
1 yd or more of decorative ribbon (no limit to your creativity-Go Wild!!)
Hot glue gun and glue (My best friend for crafting)
1. glue the elastic together at the ends to fit your child's waist
2. cut tulle into 1 yard strips
3. fold the strips in half. Fold in half again creating a loop
4. loop through itself around the elastic and pull tight SEE BELOW

5. Continue to fill the elastic waist with loops until full
6. Add decorative ribbon in loops and, or a bow.
7. For extra cuteness, hot glue a flower at the seam
Tutu is ready to wear! It's that simple.
Subscribe to:
Posts (Atom)